30 March 2013

Springing into Spring


Hello everyone! Time is flying so fast! Can you believe we are celebrating Easter Holiday's? Despite really bad and bitterly cold weather SRING ARRIVED! 
I've put out my Easter decorations, bought some nice bunch of daffodils and made some nice Easter cards.
I would like to share this one for Daring Cardmaker's challenge 
Springing into Spring
set up by Beckie.


She asked us to create cards with a 'spring' on. 
 That is not all! We have fantastic sponsor with fabulous prize to be won!
This week digital stamp store 'Little Blue Button' is sponsoring the dare and have a $10 gift certificate to give away!


 Please come to play with us and check the rules here!

And now my card :


I was playing with fabric and die cut my frame from beautiful vintage fabric.

I enjoyed to play with silk ribbon and tied big luxury bow! You can find all these fantastic ribbons  in Tea House Bridge The stamp in the middle of the frame is one of the fabulous Stampin'up Vintage Verses! Oh, how I love Stampin'up! :0)

Parker Lower Alphabet Set is my new darling from Memory Box! I thing my new best friend! :0)

I found this cute felt spring chick in Hobby Craft last year. All you need is to adhere! How quick and pretty! ;0)

Have a beautiful and relaxing Easter break with your dearest ones!


Used Material :


25 March 2013

Chalkboard Creations


Good Morning and Hello new week! Today I want to share with you card created for    

Chalkboard Creations challenge.

It's Nat here bringing you this week's dare.

So this week I've challenged the design team and you to... 
Create a card that pays homage to the chalkboard look


Ideally I would love it if you could try the heat embossing technique, but if you don't have the supplies there are plenty of fonts and printables out there that you could use to replicate the look.

Over the past few months I've been seeing a lot of beautiful pins on Pinterest showcasing various types of Chalkboard Artwork.

From gorgeous handwritten signage to amazing murals in homes and businesses...


Pictures taken from Pinterest


and here is my card :


Have a fantastic Monday!


Used Material :

Kraft, white, green cardstock, Pink Paislee - Daydream, Melissa Frances - Kitschy Kitchen, Embellished cardstock eggs from Hobby Craft, Ribbons, Fabric roses, Magnolia and Spellbinder dies, Adhesive pearls, PC and printer, mounting pads and thread.


20 March 2013

Spring Cottage


It's Tammy's turn to host this week The Ribbon Reel Challenge. 
Spring Cottage

She has chosen this beautiful photo ..... 


and ask that you create a card / project using the PINK, YELLOW & AQUA plus  RIBBON & A FLOWER.


Here is my card :


Spring is nature's way to say 
"Lets Party"

Have a lovely day!


 Used Material :

White cardstock, Prima Meadow Lark Collection, MME Market Street 'Lovely' Shabby Chick Paper, Melissa Frances Vintage spring transfers, All fantastic pink and blue ribbons and trims are from
The Ribbon Reel, Letraset promarker Rose Pink, White tag, Fancy scissors, Inks, Thread and Mounting pads.


15 March 2013

A Cute Angle


Hello everyone! It's Friday! Hooray! Time for crafting and sharing some new inspirations with 

we want to see some sharp shapes. Geometry is all the rage in cardmaking so we would like to see geometric shapes in play as you
Make a cute angle

 its a play on words really - "a cute angle" is like "acute angle" get it? Or perhaps not... If you can make your acute angle cute then that would be fab too. However you interpret the dare we would love to see the results. 

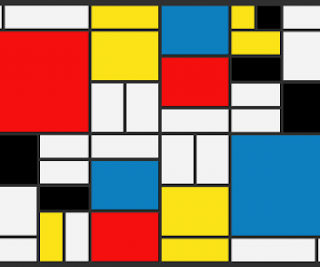
I took inspiration from famous Dutch artist Piet Mondrian :

   his Abstract cubes and squares

... and my card :
  
My card look very simple, but in real is not! :0)
I haven't use die cut machine!
Yep! I cut all by hand.  

 
I took black American Craft cardstock. Cut out panel to fit the card front, then took ruler and pencil and started a real measuring work to have all my squares and rectangles in right balance.
Then came a hardest bit of work to cut out all geometric pieces very neatly!
I worked very slowly and sometimes didn't breath :0)


 Then I adhered colour parts from reverse of my delicate black construction and
finished with felt adhesive letters.


Everything is expressed through relationships. 
(Piet Mondrian) 


Have a fantastic artistic Friaday!
See you soon!


Used Material :

 White cardstock for the card base, American Crafts Brights and Earth tones, Making Memories felt alpha stickers, sharp craft nife and ruler.


11 March 2013

Typography


This week it's Leo's turn at Daring Cardmakers and her challenge is: 

'Typography'

I'd like you to use typography as the main basis for your card design. Typography is basically putting together letters and/or words to form an aesthetically pleasing or artistic design/arrangment. So you're making the letter/words the main embellishment of your card.

Here is my card :


How I created my unique chipboard letters :

1. naked chipboard letters
2. applied liquid adhesive
3. wrapped decorative tissue paper ( Deco Print - Rose napkin, up cycle an old aqua tissue paper )
4. left to dry
5. applied transparent nail polish to add some gloss
6. paint around the edges with white acrylic paint

Then I've played with embellishments and decorate my letters.


Have a fabulous Monday!


Used Material :


White cardstock for the card base, MME patterned paper, Daisy Backet Designs paper, Rayher chipboard letters, Deco Print - Rose napkin, Old pink and aqua tissue paper, Pink cotton fabric, Ribbon, Cuttlebug heart die, button, adhesive pearls, Martha Stewart and Woodware punch, WHSmith brad, Acrylic paint, white thread, ink.


6 March 2013

Favourite Things


Good morning everyone! I want to share my card created for By The Cute And Girly Blog
 Favourite Things
challenge by talented Lora.
She asked us to create a card with our favourite things on like fav pattern paper, material, embellies, photo or colour combo.

I mixed couple of things together :0)
My fav colour combo, emblellie shape and material.


First I made white base card, then stamped card front to create pretty pattern. 


Adhere a panel of pattern paper on the bottom of the card. Round and ink the edges around.
Attach a lace and stamped 'Happy Birthday' sentiment.

Trace two heart shapes on the white cardstock paper, each one slightly bigger. Spray cream fabric with brown glimmer mist and leave it dry. Cut out vintage pattern fabric stripe and beige felt stripe using pinking scissors. Wrap smaller cardstock heart with dry fabric. Embellish with pattern fabric, beige felt and red pom pom trim. Add white felt flower with red button to finish. I've affixed my heart on card front with mounting pads to add some dimension. My last touch was aqua satin bow.


Have a beautiful day!


Used Material :

White cardstock for the card base, October Afternoon pattern paper, Clear stamps included with Get Stamping Magazine and Simply Cards Magazine, Fabric, Felt, Pom pom trim, Ribbon, Lace, Versa Color Magenta and Sand Beige, Staz On Saddle Brown and Timber Brown, Staz On Blazing Red, Round corner punch, Tattered Angels Decadence Glimmer Mist.


5 March 2013

Romantic Elegance


Time is flying so fast that we have another fortnight Ribbon Reel Challenge here. 
This time challenge #48 with Helen's inspirational photo :


and ask that you create a card / project using the COLOURS of the photo plus FLOWERS & RIBBON.


My Card :


Used material :

White Cardstock for the base
Pattern Papers are all Crate Papers :
Pink Plum Collection - Very Berry, Wildberries
Bliss Collection - Glee
Brunch Collection - Sky
Stamps:
American Crafts - Dear Lizzy
Lilybee - Victoria Park
Dies:
Spellbinder labels, circles
Punches :
Round corner 
Martha Stewart Butterfly

Ribbons,twine and paper flowers are from The Ribbon Reel
Woodware buttons
Papermania Mosaics
Letraset Promarker
Inks
Mounting pads